Reproducible science and collaboration with Git and GitHub
Ahmed Hasan
Lesson preamble
Lesson objectives:
- Understand basic bash commands
- Understand the logic of version control
- Practice using Git commands at the command line
- Learn how and when to use branches
- Learn how to effectively use Pull Requests
- Learn how to work with forks
Lesson outline:
- Intro to Git (50 min) - Bash Primer (15 min) - Getting started with Git (5 min) - Version control with Git (30 min)
- Collaborating with GitHub (50 min) - Creating a fork + GitHub setup (5 min) - Branches and pull requests (40 min) - Issues (5 min)
- Appendix: Collaborating with GitHub without the command line (50 min)
Intro to Git
Git is a version control system that tracks changes in files. Although it is primarily used for software development, Git can be used to track changes in any files, and is an indispensable tool for collaborative projects. Using Git, we effectively create different versions of our files and track who has made what changes. The complete history of the changes for a particular project and their metadata make up a repository.
To sync the repository across different computers and to collaborate with others, Git is often used via GitHub, a web-based service that hosts Git repositories. In the spirit of ‘working open’ and ensuring scientific reproducibility, it has also become increasingly common for scientists to upload scripts and related files to GitHub for others to use.
In this lesson, we’ll be covering some basic Git commands, before moving on to using GitHub for the upcoming group projects. All members of the group will be given admin access to a pre-made repository.
Command line Git
Setup and Installation
Git is primarily used on the command line. The implementation of the command line that we’ll be using is known as a ‘bash interpreter’, or ‘shell’. While bash interpreters are natively available on Mac and Linux operating systems, Windows users may have to externally install a bash shell.
To install Git on a Mac, you will have to install Xcode, which can be downloaded from the Mac App Store. Be warned: Xcode is a very large download (approximately 6 GB)! Install Xcode and Git should be ready for use. (Note: most students will have already installed Xcode already for some R packages we used earlier in the course. If you’re not sure whether this is the case, run the git --version command described below)
To install Git (and Bash) on Windows, download Git for Windows from its website. At the time of writing, 2.19.1 is the most recent version. Download the exe file to get started. Git for Windows provides a program called Git Bash, which provides a bash interpreter that can also run Git commands.
To install Git for Linux, use the preferred package manager for your distribution and follow the instructions listed here.
To test whether Git has successfully been installed, open a bash interpreter, type:
git --versionand hit Enter. If the interpreter returns a version number, Git has been installed.
Bash Primer
Before we can use Git in the bash interpreter, it’s worth learning a few basic bash commands. All bash commands are run simply by typing them into the interpreter and pressing Enter. All instances of foldername and filename should be replaced with the name of whichever file/folder you would like to provide as input to the operation.
pwdpwd, or ‘print working directory’, will return the folder bash is currently in. This is similar to the concept of the working directory in R that we discussed earlier in the course.
cd foldernamecd changes the current working directory to an input folder (in place of foldername). This is useful in tandem with ~, which is shorthand for ‘home directory’ in bash (usually /Users/[yourname]). To navigate to your Desktop, the command would be cd ~/Desktop.
cd .. will let you move back up one folder. If your current working directory is /Users/[yourname]/Desktop, for instance, cd .. will change it to /Users/[yourname].
lsls will return what files/folders are within the current working directory. This is useful when you have just used cd to change your current directory and need a quick reminder of what’s in said directory.
mkdir foldernamemkdir, or ‘make directory’, will create a new directory with the specified name. For instance, mkdir thesis will create a folder called thesis, which can then be entered with cd thesis.
nano filenamenano is a text editor for Unix-like systems that opens right within the bash window. If the filename provided doesn’t refer to an existing file, nano will create a new file with that name. Once you’re done with nano, press Control + X to exit - nano will ask whether you want to save your work, which can be answered by pressing either y or n. Alternatively, Control + O followed by Enter will save your current work, after which Control + X will exit without prompting.
You can use any other text editor based on your system, such as Notepad on Windows.
Getting started with Git
First, we have to tell Git who we are. This is especially important when collaborating with Git and keeping track of who did what! Keep in mind that this only has to be done the first time we’re using Git.
This is done with the git config command. When using Git, all commands begin with git, followed by more specific subcommands.
git config --global user.name "My Name"
git config --global user.email "myemail@example.com"
Next, we have to set a default text editor for Git. Here, we’ll use nano, as mentioned above:
git config --global core.editor "nano"If you would like to set up a different text editor as your default, see here.
Finally, the following command can be used to review Git configurations:
git config --listVersion control with Git
Note: Material for the following section of the class was taught from Software Carpentry’s openly available Intro to Git lesson, which is available in its entirety here.
Material covered in class, in order:
Summary: Basic Git commands
git init(orgit clone)git statusgit loggit addgit commitgit checkout
Branching
Git commit history is a directed acyclic graph (or DAG), which means that every single commit always has at least one ‘parent’ commit (the previous commit(s) in the history), and any individual commit can have multiple ‘children’. This history can be traced back through the ‘lineage’ or ‘ancestry’.
What are branches?
Branches are simply a named pointer to a commit in the DAG, which automatically move forward as commits are made. Divergent commits (two commits with the same parent) could be considered “virtual” branches. Since they are simply pointers, branches in Git are very lightweight.
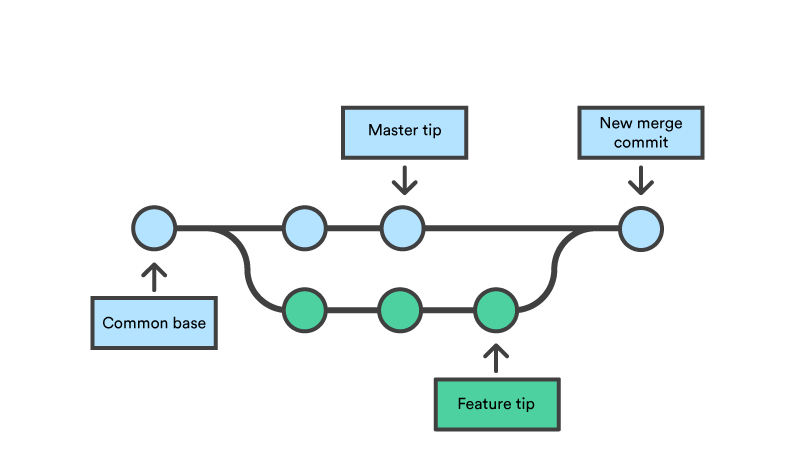
Examples of branching (Source: Atlassian Bitbucket Tutorials)
Why use them?
- To keep experimental work separate
- To separate trials
- To ease collaboration
- To separate bug fixes from development
We will focus more on branches in the second section of the lesson when we learn about GitHub.
Collaborating with GitHub
Although command line Git is very useful, GitHub allows for easy use of Git for collaborative purposes using a primarily point-and-click interface, in addition to providing a web-based hosting service for Git repositories (or ‘repos’). If you have not already made a GitHub account, do so now here.
All groups have been provided with existing repositories, but a new repository can be made by clicking on the + in the top right of the page and selecting ‘New repository’. For now, however, navigate to your provided group repo.
Creating a fork
The repos that have already been created can be thought of as ‘main repos’, which will contain the ‘primary’ version of the repo at any given point in time. However, instead of directly uploading and editing files right within this main repo itself, we will begin by forking the repo. When a given user forks a repo, GitHub creates a user-specific copy of the repo and all its files.
To fork your group’s repo, navigate to the repo’s page and click on the ‘Fork’ button at the top right of the page. Following a brief load screen, GitHub will redirect you to your new, forked repo.
You’ll notice that on the top left of this repo page, the repo’s name will be ‘[your username] / [repo name]’, as opposed to ‘EEB313 / [repo name]’. Furthermore, GitHub will indicate that this is a fork right underneath said repo name (‘forked from eeb313-[year]/ [repo name]’).
Branches and Pull Requests
Currently, your fork is identical to what the original repo looked like at the moment of forking, and so GitHub will indicate that the fork is currently ‘even’ with its original. Any edits that are made in the fork will be unique to the fork, leaving the original unchanged.
But how do you add these changes to the main repo? Doing so is a two step process:
First, create a branch on your fork (not the main repo). This is yet another copy of the fork (a copy of a copy!) that will store changes separately from ‘master’, which is the default branch.
Once you have made our changes in this branch, submit what’s known as a pull request from this edited branch to the main repo. This allows your changes to be reviewed by the other members of your group before they are merged into the main repo.
Although this process may seem a bit laborious, using this method (also known as the ‘GitHub flow’) minimizes chances of error and ensures that all code is reviewed by at least one other person. Understanding how and why this process works is key to collaborative work in software development and the like, and is used by all sorts of open source projects on GitHub (including dplyr itself!)
Creating a new branch
In a given repo, there is a ‘Branch: master’ button just above the list of files. Clicking on this will bring up a dropdown menu containing a list of branches (which currently just contains master) and a text field. A new branch can be created by typing in the text field. Start by making a new branch called initial-edit using said text field. GitHub will then refresh, and the button will now say ‘Branch: initial-edit’ instead.
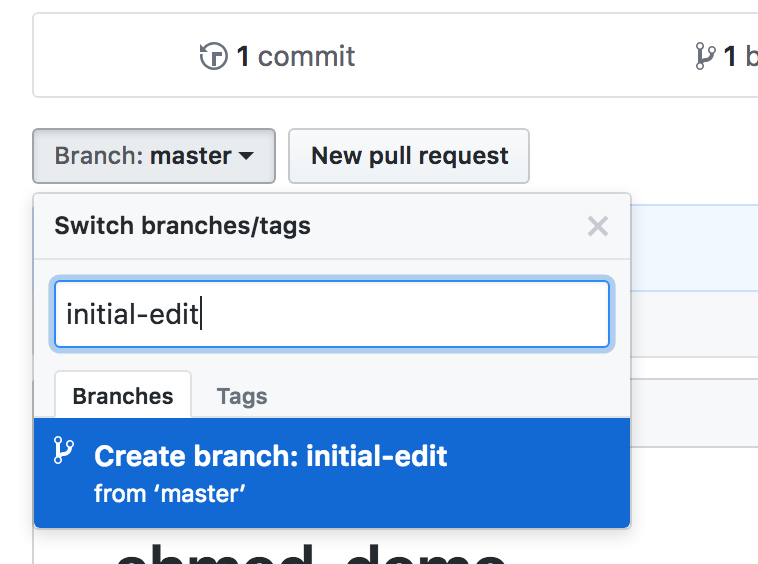
Pictured: the branch dropdown menu
The dropdown can now be used to switch back to master, but let’s stay in initial-edit for now. This is the place to make new changes – either by editing existing files or creating new ones. Let’s create a simple Rmd file with the ‘Create new file’ button on the right side of the repo page.
---
title: "Test R Notebook"
author: "Your Name"
output: pdf_document
---

Hello! This is my R notebook.

```{r}
print('Hello, GitHub!')
```
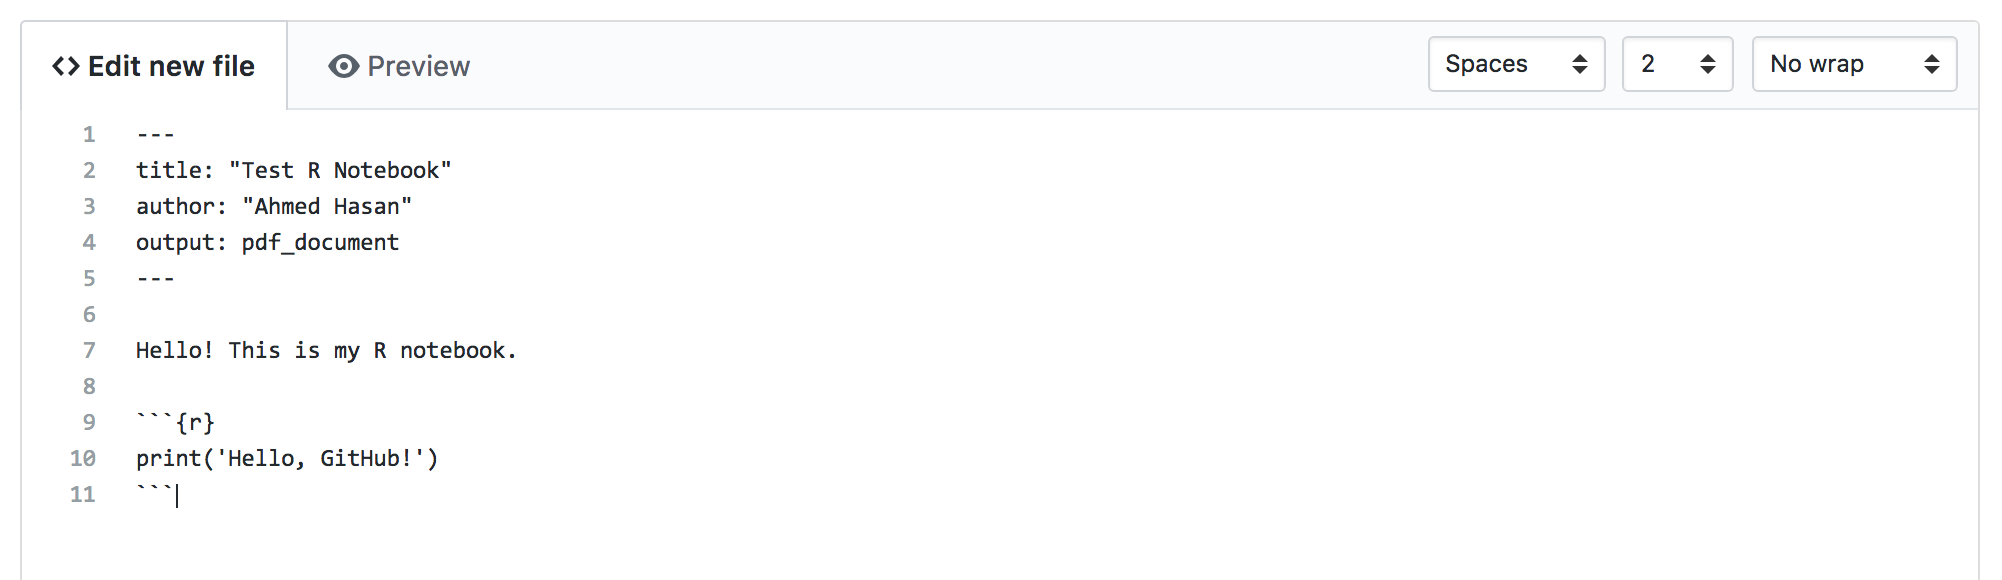
Pictured: editing a file on GitHub
Once done, scroll to the bottom of the page and add a commit message using the text file – something like ‘initial Rmd file creation’ – and then click on ‘Commit new file’.
Pull requests
After a commit has been made, GitHub takes you back to the main repo page, but now with an attention-grabbing yellow prompt about these new edits. GitHub has noticed that your fork has a new branch with edits, and over on the right side of the prompt, GitHub presents the option of creating a pull request.

Pictured: GitHub’s pull request prompt
If you don’t see the yellow prompt, head to your fork and switch to the branch containing your edits. Underneath the green ‘Clone or download’ button, there is a ‘Pull request’ option – this can be used to open a pull request instead. You’ll also notice that the left side of this bar lists how many commits ahead of master your branch currently is.
Following either method of opening a pull request, GitHub takes you to the ‘Pull requests’ tab of the main repo and prompts you to write about your pull request. Here, you can (and should) explain the changes you’ve made for your group members, so that they know what to look for and review. Be specific and detailed to save your group members’ time – it’s a good idea to start off your pull request message with an overall summary (‘adding dplyr code to clean dataset’) followed by a point-form list of what changes have been made, if necessary.
Once the pull request has been made, GitHub will list both your message and your commit messages below. You also have the option of merging the pull request yourself – but don’t do this! When collaborating, always have someone else review and merge your pull request.
If all does not look good, your team members can add messages below, and tag others using the @ symbol, similarly to most social networks. If more changes are needed before the pull request is ready to merge, any new commits you make to the branch on your fork (initial-edit in our case here) will automatically be added on to the pull request. This way, you can incorporate any changes or fixes suggested by your team members simply by continuing to work in your fork’s new branch until your changes are ready to merge.
Once a pull request has been merged into the main repo, the branch on your fork isn’t needed anymore. Because of this, GitHub will immediately prompt you to delete the initial-edit branch as soon as the merge has been completed.

Pictured: GitHub’s branch deletion prompt
Great work – your edits are now on the main repo!
Syncing your fork
There’s one issue with the above, though – now, the master branch on your fork is out of date with the current state of the main repo. The fork has to be synced to remedy this issue.
First, head to your fork on GitHub, and click on the green ‘Clone or download’ button on the right side of the page. This yields a link to your fork. Copy this link to your clipboard.
Next, open a bash shell, and navigate over to whichever folder you would like a copy of your repo to be saved in. Then, run:
git clone [repo link]With the link in place of [repo link]. This process, known as cloning, will create a new folder in your current working directory that contains the contents of your fork. Enter this new folder with cd and type git status to make sure the repo has been cloned properly. git status should output that the branch is even with origin/master, indicating that it is currently the same as the current state of your fork.
To get your fork up to date with the main repo, you next have to add a remote linking to the main repo. Head to your group’s repo and once again click on ‘Clone or download’ to grab its link. Then, using the main repo link, run:
git remote add upstream [repo link]Once this is done, run:
git remote -vto get a list of existing remotes. This should return four links, two of which are labelled origin and two of which are labelled upstream.
Next, you have to fetch the new changes that are in the main repo.
git fetch upstreamOnce the edits have been downloaded, merge them into your local repo:
git merge upstream/masterYour local copy is now even with the main repo! Finally, push these changes to the GitHub version of your fork:
git push origin masterand now the GitHub version of the fork is all synced up, ready for your next batch of edits, and eventually another pull request!
Keeping your fork up to date
When other group members add to the main repo through their own pull requests, you have to make sure those edits have been incorporated into your repo before making new changes of your own. This ensures that there aren’t any conflicts within files, wherein your edits clash with someone else’s if one of you is working with an earlier version of the file.
To remain up to date, navigate to the local copy of your repo using bash, and once again repeat the above steps:
git fetch upstream
git merge upstream/master
git push origin master
Note: The git pull command combines two other commands, git fetch and git merge.
This will download any changes your group members may have made and update both the local and GitHub versions of your fork accordingly. Before starting any edits of your own, it’s usually a good idea to start off by checking to see whether anything’s been added to the main repo and, if needed, then syncing your fork to account for that.
Issues
Finally, each repo on GitHub also has an Issues tab at the top of the page. Here, you and your group can create posts regarding the content of the repo that highlight issues with code or serve as to-do lists to manage outstanding tasks with.
Although issues aren’t needed for any of the steps we discussed above, it can be useful to create a roadmap of your project with them and
assign group members to specific tasks if need be.
To sum up
The ‘GitHub flow’:
- Make sure your fork is up to date
- Create a new branch on your fork
- Make your edits (with informative commit messages along the way)
- Submit a pull request
- Have your group members review your pull request
- If your group requests further edits prior to merging, make more commits in the new branch
- Once your edits have been merged, delete your new edits-containing branch
- Sync your fork to be up to date with the new changes
Collaborating with GitHub without the command line
The following section is a modified version of the above section that covers collaboration with GitHub without the use of the command line.
All groups have been provided with existing repositories, but a new repository can be made by clicking on the + in the top right of the page and selecting ‘New repository’. For now, however, navigate to your provided group repo.
Creating a fork
The repos that have already been created can be thought of as ‘main repos’, which will contain the ‘primary’ version of the repo at any given point in time. Although we will in fact work within this ‘main repo’ in this version of the lesson, we will still begin by forking the repo. When a given user forks a repo, GitHub creates a user-specific copy of the repo and all its files.
To fork your group’s repo, navigate to the repo’s page and click on the ‘Fork’ button at the top right of the page. Following a brief load screen, GitHub will redirect you to your new, forked repo.
You’ll notice that on the top left of this repo page, the repo’s name will be ‘[your username] / [repo name]’, as opposed to ‘EEB313 / [repo name]’. Furthermore, GitHub will indicate that this is a fork right underneath said repo name (‘forked from eeb313-[year]/ [repo name]’).
For the duration of this lesson, we will stick to the eeb313 version of your group’s repo. Although the fork-based workflow (see above) is much more common in practice (especially since it works when collaborating on repos that one doesn’t have admin access to) it is a bit more advanced and not particularly needed for these projects. You are of course welcome to incorporate a fork-based workflow on your own time – but for the purposes of this class, your forks can just be used as sandboxes for you to test out things if you’d like.
Branches and Pull Requests
How does one collaboratively work on a single repo? The trick to that involves branches. A branch is a copy of the repo that will store changes separately from master, which is the default branch. The master branch should be thought of as the actual current state of your project – branches are meant, by design, to be temporary, and exist only to facilitate edits and experimental work while avoiding any risk of breaking the original codebase.
The general collaborative workflow is as follows:
First, create a branch on the main repo.
Make edits in the branch. These could involve adding/deleting lines of code or even adding/removing entire files. Keep in mind that the branch is separate from the main codebase, so don’t worry too much about deleting things or making large changes.
Once you have made your changes in this branch, submit what’s known as a pull request (PR) from this edited branch to
master. A PR neatly packages all the edits that have been made in your branch for review by other members of your group.Once your changes have been approved, merge the PR. It’s good practice to have group members merge your PRs instead of doing it yourself.
Although this process may seem a bit laborious, using this method (also known as the ‘GitHub flow’) minimizes chances of error and ensures that all code is reviewed by at least one other person. Understanding how and why this process works is key to collaborative work in software development and the like, and is used by all sorts of open source projects on GitHub (including dplyr itself!)
Creating a new branch
In a given repo, there is a ‘Branch: master’ button just above the list of files. Clicking on this will bring up a dropdown menu containing a list of branches (which currently just contains master) and a text field. A new branch can be created by typing in the text field. Start by making a new branch called initial-edit using said text field. GitHub will then refresh, and the button will now say ‘Branch: initial-edit’ instead.
Pictured: the branch dropdown menu
The dropdown can now be used to switch back to master, but let’s stay in initial-edit for now. This is the place to make new changes – either by editing existing files or creating new ones. Let’s create a simple Rmd file with the ‘Create new file’ button on the right side of the repo page.
---
title: "Test R Notebook"
author: "Your Name"
output: pdf_document
---

Hello! This is my R notebook.

```{r}
print('Hello, GitHub!')
```
Pictured: editing a file on GitHub
Once done, scroll to the bottom of the page to save your changes. In GitHub lingo, a saved change is called a commit – this can be thought of more as a ‘checkpoint’. GitHub requires that all commits have an associated commit message describing the change. This may seem a bit draconian, but it ensures that all changes have been documented, which is something that may save you and your group members a lot of trouble down the line!
While there is a default commit message GitHub will fill in, it’s best to add a custom one. It’s good practice to leave detailed commit messages as much as possible, so that both your collaborators as well as future you can understand what each commit did in case something goes wrong down the line. In this case, however, something like ‘initial Rmd file creation’ will do. Click on ‘Commit new file’ to complete the process. Note that the radio button underneath specifically says ‘Commit directly to the initial-edit branch’. This means that your edit will only exist in initial-edit for now – master remains unchanged.
Pull requests
After a commit has been made, GitHub takes you back to the main repo page, but now with an attention-grabbing yellow prompt about these new edits. GitHub has noticed that there exists a new branch with edits and that these edits differ from what’s in master. Over on the right side of the prompt, GitHub presents the option of creating a pull request (PR). A PR is GitHub’s way of neatly packaging one or more commits that have been made in a branch into a single request to merge said commits into master. In our case, a PR is essentially you telling your group members: “Here are all the edits I’ve made. Have a look, and add them to master if you think they’re ready to go.”
Pictured: GitHub’s pull request prompt
If you don’t see the yellow prompt, switch to the branch containing your edits. Notice the ‘New pull request’ button next to the branch dropdown – this can be used to open a pull request instead. You’ll also notice that the left side of this bar lists how many commits ahead of master your branch currently is.
Following either method of opening a pull request, GitHub takes you to the ‘Pull requests’ tab of the repo and prompts you to write about your pull request (i.e. describe the changes you’re attempting to merge). Here, you can (and should) explain the changes you’ve made for your group members, so that they know what to look for and review. Be specific and detailed to save your group members’ time – it’s a good idea to start off your pull request message with an overall summary (‘adding dplyr code to clean dataset’) followed by a point-form list of what changes have been made, if necessary.
Once the pull request has been made, GitHub will list both your message and your commit messages below. Clicking on any of these commits opens up a new page highlighting the changes made in that specific commit. You also have the option of merging the pull request yourself – but don’t do this! When collaborating, always have someone else review and merge your pull request.
If all does not look good, your team members can add messages below, and tag others using the @ symbol, similarly to most social networks. If more changes are needed before the pull request is ready to merge, any new commits you make to the branch on your fork (initial-edit in our case here) will automatically be added on to the pull request. This way, you can incorporate any changes or fixes suggested by your team members simply by continuing to work in your fork’s new branch until your changes are ready to merge. For line-specific edits, if a file is opened up (i.e. by clicking on one of the commits), clicking on the + button that appears when hovering over a line number will allow you or a group member to add a comment specifically attached to that line. This can be useful when pointing out typos, for instance, among other things.
Once a pull request has been merged into the main repo, the initial-edit branch (or whatever you have named your branch) isn’t needed anymore. Because of this, GitHub will immediately prompt you to delete the initial-edit branch as soon as the merge has been completed right in the PR.

Pictured: GitHub’s branch deletion prompt
Great work – your edits are now on master!
Resolving merge conflicts
Unfortunately, things aren’t always as smooth as the above process. Often, there may exist two versions of the same file with divergent edit histories. Here are a few scenarios where this might happen:
You create a branch called
update-plots. In a file calledplots.Rmd, you add code for a bar plot. However, someone makes the mistake of working directly inmaster, and writes code for something else in the same file. When you create your PR fromupdate-plots, Git has trouble merging your edits, since there would exist two separate blocks of code in the same part of themasterfile if it did. Git is not sure which one should take precedence, and will not make assumptions.After explaining to your collaborator that editing in
mastershould be avoided, you create a branch calledadd-modelsand do some stats in a file calledanalysis.Rmd. However, you take the weekend off, and in the interim, one of your group members creates a separate branch calleddo-statsand edits the same file. You both start from the same file, but your final files look different. Both of you submit PRs. The first PR to get merged has no issues, but the second PR cannot be merged intomaster, because themasterversion ofanalysis.Rmdhas now changed.
To deal with issues like these, GitHub allows for merge conflict resolution. The way resolution works is that a conflicting PR can still be submitted, but the ‘Merge pull request’ button will be greyed out. Instead, there will be a ‘Resolve conflicts’ button, which opens up a text editor in the browser. The text editor will show the file but contain both versions of the conflicting edits, essentially asking you to delete whichever version of the text you want removed. The offending lines should look something like this:
<<<<<<< test-update
print('Hello')
=======
print('Goodbye')
>>>>>>> master
This tells us that print('Hello') is what’s on this line in this file in the test-update branch, while the master branch has print('Goodbye') on the same line. To keep the test-update version, all of the text here has to be deleted except for that line of code, including the separator (=======) line as well as the lines listing the branches. In the end, it should simply look like this:
print('Hello')after which the ‘Mark as resolved’ button on the top right of the text editor will be un-greyed. Once that has been clicked, click on the new ‘Commit merge’ button to fix the issue, which will redirect back to the PR page. The PR can now be merged!
To sum up
The ‘GitHub flow’, without the command line:
- While in
master, create a new branch - Make your edits (with informative commit messages along the way)
- Submit a pull request
- Have your group members review your pull request
- If your group requests further edits prior to merging, make more commits in the new branch
- Once your edits have been merged into
master, delete your branch
Additional resources:
- A visual demonstration of the GitHub flow.
- A useful Git command cheat sheet.
- Guide to a good Git Workflow
This work is licensed under a Creative Commons Attribution 4.0 International License. See the licensing page for more details about copyright information.